SalsaScript Tutorial (1, 2, 3, 4, 5)
This tutorial is a primer on how to get set up using SalsaScript and creating a simple news aggregator. Before you can begin developing in SalsaScript, you will need a developer account for Salsa. If you don't already have one, you can sign up for a developer account here.
Once you have your developer account, you can learn about how to manage your projects, build on top of Salsa, set permissions, and then publish your code.
Part I - Getting set up
Please note that this documentation is in the process of being expanded. Check back soon for full details on testing and deploying your packages.Connecting to the SalsaScript Repository
Files you develop and deploy are stored in a Git repository, that you can edit either through a Git client, or by directly mounting a drive on your machine, using a protocol known as WebDAV. Both methods are described below.
Using WebDAV
Editing files using WebDAV is as simple as mounting a remote directory, and creating and editing normal files.
For OS X
To mount your directory in OS X:
- Go to the Finder application, and click the Go menu. Click on Connect to Server.
- In the box, cut and paste the URL:
http://dav.salsalabs.com:80/PROJECTNAME/
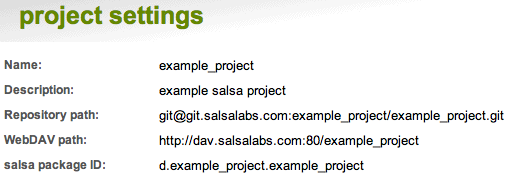
Where PROJECTNAME is the name of the project that you created in the 'Developer Tools' section of your sandbox account:
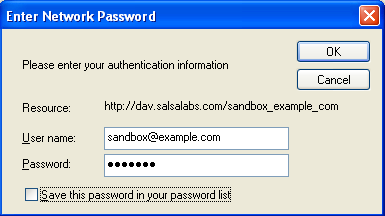
- Your username and password are the same as the email and password you used to log in.
For Windows (XP SP3 and higher)
Some Windows systems natively support the WebDAV protocol. However, in many of them, WebDAV is not completely stable. There are many third-party WebDAV clients available for Windows that may work better. The following steps may not work for everyone:
(for Windows XP and Vista users) Download and install Microsoft's Web Folders Update Thanks to Scott Duncombe from The Bus Project for this tip!
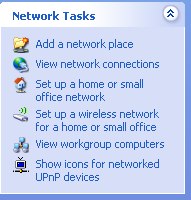
From 'My Network Places', click 'Add a network place' in the left sidebar
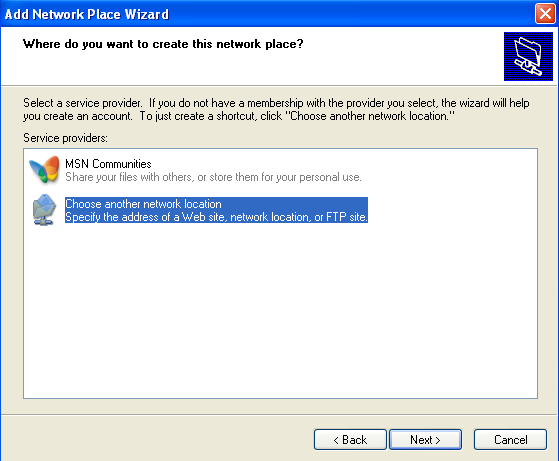
In the wizard, select "Another network location"
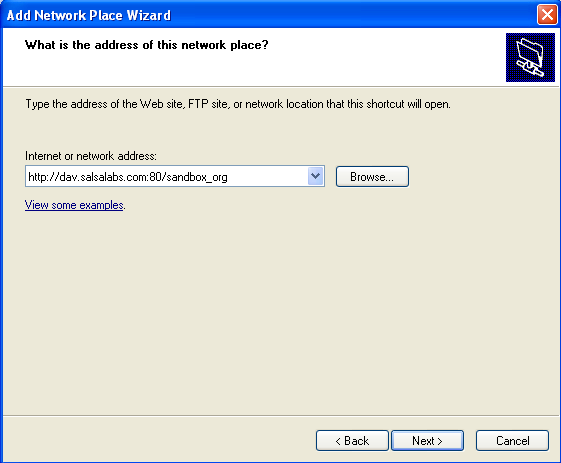
Copy the WebDAV path from your project management page and paste into the input box. Make sure that port ":80" appears after http://dav.salsalabs.com
In the "Enter Network Password" windows, enter your HQ login info
If successful, you'll be presented with a window asking you to name the newly added network location.

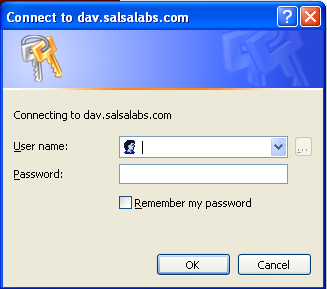
If you're ever presented with the login window below, close it by clicking the cancel button (attempting to enter credentials in this window will not lead to happiness)
Alternatively, use git, described below.
For Linux
Linux users may opt to use the native webdav feature in their operating system. For a more configurable environment, they may also opt for WDFS (WebDav FS) or davFS2. Both of these are file system modules for FUSE and allow for the codebase to be viewed as a mounted drive and manipulated directly from vi, emacs, or the editor of your choice.
Otherwise, use git, described below.
Publishing your package
Publishing your package simply requires you to click the “publish my project” link inside your developer tools package
Using git
Using git gives you more control over versioning of your files, and on slow internet connections will perform significantly better than a WebDAV mount. You should be familiar with Git before connecting.
Cloning your git repository for the first time
-
the very first thing you need to do is to create your SSH keys, if you do not already have one:
in your console, enter
ssh-keygen -t rsa
please check your country's export laws regarding cryptographic keys[salsaDev@ ~]$ ssh-keygen -t rsa Generating public/private rsa key pair. Enter file in which to save the key (/homes/salsaDev/.ssh/id_rsa): id_rsa Enter passphrase (empty for no passphrase): Enter same passphrase again: Your identification has been saved in id_rsa. Your public key has been saved in id_rsa.pub. The key fingerprint is: e6:1a:7f:e3:7c:0e:a2:d0:dd:3b:d1:89:91:d7:18:6a salsaDev@localhost.localdomain
do not share the contents of id_rsa with anyone.
-
Now that you have your SSH keys created, add it to your developer account:
-
visit your project management page and find your repository path:
-
Clone your repository by entering the following command to your console:
git clone [repository path]
git branch -t production origin/production
-
edit and commit changes as needed
-
when you're ready to push code to sandbox for testing, enter the following command to your console:
git push origin master
-
when you're ready to publish code the live servers, enter the following command to your console:
git checkout production
git merge master
git push origin production